Showing posts with label tutorial. Show all posts

Friday, November 3, 2017

The Library Book Bag

A lot of people would argue that no one visits libraries anymore, but its simply not true. I personally visit my local library weekly and on those visits I need a lightweight bag to carry home all the heavy books I borrow. The library book bag is perfect for that trip to the library. There is a front patch pocket with pintuck details for the library card. The bag base is reinforced with interfacing ( nothing worse than the bottom falling out of your bag) and  the bag is unlined making it very lightweight. Finally the side seams are neatly finished and the straps are secured with a box stitch.


Materials
24 inches (60cm) woven decorator fabric main fabric
12 inches (30cm) contrast fabric quilting cotton
Interfacing
thread
2 buttons

 
Instructions
Seam allowance 5/8 inch (1.5cm)

Cut
2  17 ¾ x 13 ½ in bag body from main fabric
2  31 x 4 straps from main fabric
1  10 x 13 ½ in bag base from contrast fabric
1  8 x 6 in pocket from contrast fabric
1  8 x 4 interfacing


Cut a 2in square from each the bag body base corners.

With bag body pieces right sides together stitch base . If using directional fabric make sure it’s running the right way.

Press seam open. Press  raw edge of seam allowance under towards  the wrong side by ¼ in. Stitch 1/8 inch from folded edge through seam allowance and bag.
 
Centre and fuse interfacing to bag base.

Fold under ¼ in  to the wrong side both 13 ½ in sides of the bag base.  Find the halfway point of the 10 in side and match this with the seam of the bag. Place it right side upon the right side of the bag

Pin in place. Edge stitch at the folded edge on both sides. Backstitch at the start and finish of each seam. (Optional you can use a twin needle to stitch two rows)


trim corners

two rows of stitching
Pocket
Fold under top  edge by ¼in.  Press and fold again ½ in. stitch to hold (optional twin needle)

Measure and mark down from the top 1in, 1 1/2in and 2in. fold on each mark and stitch ¼ in from the fold. (Alternatively you could use a pintuck foot)

Press under the sides and bottom by ½ in. Trim corners to reduce bulk.

Place pocket ½ in up from the bag base and 2 ½ in from the edge, right side up on the right side of the bag. Pin. Edge Stitch from the top right hand side down to the base and up the left hard at the top left hand side pivot and stitch a second row ¼ in  in from the first row.. At each corner with the needle down lift the presser foot and pivot the bag. Pass thread tails to inside of bag tie off and trim.

 
trim seam allowance

Place right sides of bag together and stitch bag sides. Trim seam allowance of the bag body between base seam and bag base. Do not trim bag base seam allowance. Press seam allowance towards the wrong side on each raw edge as before. Stitch 1/8 in from fold edge through seam allowance only.
 
Fold strap  in half lengthwise with  wrong side together. Press, open and fold raw edges towards  the crease. Press and fold again to conceal raw side. Edge stitch lengthwise on both sides.

Turn bag right side out.
 
Place strap 2 ½ in from sides. Pin to right side with raw edges aligned. Tack ¼ in from raw edge to hold in place. Ensure strap is not twisted. Trim ½ in of seam allowance at top to reduce bulk.

Press to wrong side ¼ in top of bag and again 1 inch. Tuck straps into bag. Topstitch lower  fold, start stitching at side seam. Pull straps out of bag and top stitch edge of bag stitching straps down.


mark and stitch triangle
 
 From right side flatten base corner to create a triangle. Make sure that side seam and base seam are open and lying flat on the inside.  Fold triangle back so point meets the top of the base. Press to crease. Unfold triangle mark crease and stitch across. Fold triangle back towards bag and stitch at top to hold triangle. Backstitch to secure. Sew a button  at each triangle point for decoration. Give the bag a final press with the iron.
decorative button

box stitch for straps

seams finished neatly


Wednesday, July 27, 2016

How to Free Motion Stitch and Applique in 10 easy steps

Ice Cream Hoop Art
This is a quick and easy free motion and applique project I designed on a hot day recently using the tiniest of scraps.

Ice Cream Hoop Art
What you will need
5 inch embroidery hoop
fabric scraps in red, blue, cream and brown.
back ground fabric measuring 8 x 8 inches
fabric glue
ice cream template
black thread
darning foot
hand needle.

Instructions
1. Using the template cut out the ice cream scoops and cone.(or you could cut out the shapes free hand)
2. Assemble  and glue the ice cream shapes  in the centre of the background fabric.
3. Place the fabric into the embroidery hoop, (the opposite way to normal, so the inner ring is on the right side of the project)
4. Lower the feed dogs, change to a darning foot, place the hoop under the darning foot.
5. Using black thread begin free motion stitching around the ice cream shapes. For a bolder look stitch  over the original stitching again. Don't forget the cherry stem.
6. Remove the hoop from the machine and remove project from hoop.
7. Place project back in the hoop, this time the right way ( as seen in the photo above)
8. Trim excess fabric to 1 inch around hoop
9. Hand baste around fabric edge. Gather the fabric into the back of the hoop. Tie off the thread.
wrong side of project with fabric gather

10. Hang up your new art work and enjoy.


Friday, March 25, 2016

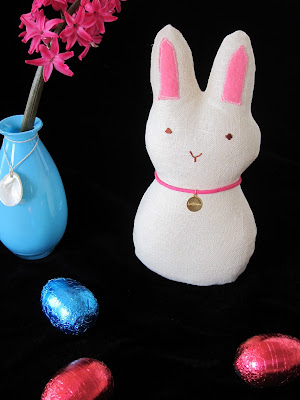
A Soft Toy

 Using the bunny shape from my spring time cushion I made a simple pillow style bunny toy just in time for Easter. It is super easy to make and safe for young children to play with (no attached parts). Use a small stitch length of about 2mm ( 13 stitches per inch) to sew the front and back pieces together. Finished the toy is approximately 9 x 5''.

Materials needed
Linen 12'' square
fleece fabric scraps for inner ear and tail
embroidery thread for eyes and nose (brown or black)
stuffing

Instructions
1 Using template cut two bunny shapes from the linen fabric, adding seam allowance of 1/4''.
2 Cut two inner ears and one tail from fleece.
3 Using a zig zag or satin stitch sew ears to right side of front bunny. Sew tail to right side of back bunny piece.
Bunny tail

4 Embroider eyes and nose to right side of front bunny.
5 Place front and back bunny pieces right sides together, sew together start and finish by back stitching. Leave an opening for turning right side out.
6 Clip into seam allowance up to stitch line every 1/4''. Turn right side out.
7 Stuff toy. Ladder stitch opening closed.
Enjoy
Bunny Template


Friday, March 11, 2016

Spring Time Cushion

Spring ahead this weekend with a  new cushion to brighten up your living space. Using crisp white linen and turquoise. My inspiration for this cushion, the warm days we have enjoyed this week. My first choice was to use piping for the edges , unfortunately I only had a scrap measuring 8 1/2 x 55 inches of the turquoise fabric. I used binding on the cushion edge instead because I think it is visually similar to piping.

To make the cushion you will need-
One front piece 14 x 14''
Back pieces 11 x 14'' and 5 x 14''
Binding fabric 2 1/4 wide, length of fabric.
Bunny fabric and wonder under 8 1/2 x 11''
Large button
One zipper 18''

Instructions for the front of the cushion
1. Draw bunny shape on paper side of wonder under
2. Fuse wonder under to wrong side of bunny fabric. Cut out bunny shape. Remove paper back, fuse to right side of front piece, centered.
3. Zig zag or satin stitch around bunny shape.
4. Sew button tail on bunny

Instructions for the back
1. Place large back piece (11 x 14) right side up on work surface. Position zipper face down along 14'' edge. pin and sew together using zipper foot.(tip- allow the zipper pull to excess the edge of fabric, this way you do not need to move the zipper pull when stitching)
small back pieces pressed under 1''. zipper excess fabric edge.
2. Press fabric away from zipper and topstitch.
3. Press one 14'' edge of smaller back piece under 1'' to form a crease.
4. Place this edge along zipper edge,(raw edge aligned with zipper edge) right side of fabric to right side of zipper. Stitch together.
5. Refold at crease (the crease should cover the zipper), topstitch, allow zipper foot to follow zipper teeth.
Flap covers zipper. Zipper pull with in fabric area.

6. Back piece should now measure 14 x 14''
7. Trim the zipper , but first make sure the zipper pull is within the fabric area.
8.Stay stitch at each end of zipper

Instruction to finish cushion
1. Place front and back pieces wrong sides together, using a 1/4'' seam allowance stitch all four sides.
2. Bind cushion edges. For instructions on binding follow steps 7 to 12 from my potholder tutorial.

Tuesday, February 9, 2016

Double Oven Glove (a Tutorial)

I love to bake. I love the feeling of sliding my hands into my oven mitts and wrapping it around the pan as I remove the freshly baked cake out of the oven. Sadly my oven glove is showing a lot of use so I decided to make myself a new one .

new oven glove

old oven glove


 Here is how you can make your own double oven Glove

Materials needed

Main fabric 17 inch
Contrast fabric 10inch
Insulated batting  (I used Insul-Bright from the warm company)
Cotton batting
Binding


Instructions
1 Cut two rectangles from main fabric 28 x 8
Cut four rectangle from contrast fabric 9 x 8 (pocket pieces)
Cut one rectangle from insulated batting 28 x 8
Cut one rectangle from cotton batting 28x 8
Cut two rectangles from cotton batting 9x8
 
2 Make a quilt sandwich from the pocket pieces as follows fabric right side down, batting and fabric right side up. Pin the layers together mark your desired quilting pattern with a fabric marker and quilt beginning in the middle of the pocket. (My quilting pattern is diagonal lines spaces 1 inch apart)
 
3 Neaten one 8 inch side by trimming any batting that is poking out. Bind that edge. This will be the top of your pocket. To bind cut a fabric strip 2 ¼ inch wide. Fold in half-length wise and press, open up, fold raw edges to meet at the center fold and press again. Place your pocket edge on the binding so the raw edge lines up with the center fold. Fold the other half over so the raw edge is now encased. Use pins or clips to hold in place. Stitch with a 3/8inch seam allowance. Make sure the top and bottom of the binding is caught in the stitching. Trim away any binding that exceeds the pocket edges.

 
4 Next make a quilt sandwich with the large rectangles and quilt that sandwich as well. This time the sandwich layers will be cotton fabric right side down, insulated batting, regular cotton batting and cotton fabric right side up.

5 Place your quilted pockets on your quilted rectangle on each end, align raw edges. The binding s should be facing the centre. Baste the pocket sides through all layers.


6 Use a dinner plate to draw the round edge of the mitt base. When you are happy with the curved outline, cut it out. Fold the oven mitt in half and trace the curve on the other end. Trim to neaten all raw edges.
7 Finish by binding. Stretch the binding a little as you go around the curves.
 
Hope you enjoyed this tutorial
Thanks for reading

Breaking the Pattern- Review

I was excited to see a new sewing book at my local library last week. Without much thought I checked it out. The book is 'Breaking ...