Its that time of year when people make new years resolutions, mine this year is to improve my dressmaking skills. Following a commercial pattern and stitching up a dress is easy, making that dress fit me well is not so easy. So 2017 is the year I learn to sew a well fitting dress.
My plan is to make toile versions of all the free dress patterns I have been collecting with my Simply Sewing subscription. This is the first step in my self challenge, the second step is to make one well fitting toile each month and finally the bonus will be to make one well fitting dress to wear.
I welcome any advice from more experienced sewist so feel free to leave a comment. Also you are welcome to join me in this challenge.
For the month of January I will work on 'The Rosie Dress" by Cotton and Chalk.
Here's to a happy creative year!
Saturday, December 31, 2016
Wednesday, November 16, 2016
Show and Tell


It's a very large bag.
Wednesday, November 9, 2016
Gift giving Makes

I also plan to make "The weekend tote" for mum. The fabric has been chosen, all necessary materials purchased now I just need to find time to make it before I leave for home next week.
What are you making to gift this year? whom is it for?
Wednesday, November 2, 2016
Applique Letters to your handmade gifts for a personal touch

Two easy ways this can be done are:-
Method One
Purchase ready made applique letters. Follow manufactures instructions to adhere letter to fabric (my letter is by Wrights)
Method Two
Trace alphabet letter in reverse onto the paper side of paper backed fusible web like Wonder under.
Cut out letter and fuse to wrong side of fabric.
Cut out letter from fabric.

Peel off paper and fuse to the right side of project fabric.
Sew around alphabet letter to secure to project.
Pull loose thread to wrong side of fabric.
Tuesday, October 18, 2016
Show and Tell
 I have been making small pouches (approximately 6 x8 inches) using a free hand machine embroidery dog design this week.
Thursday, September 29, 2016
Pattern Matching


Pattern matching takes extra time in planning, cutting and sewing. More fabric is often needed*, but it is all worth it for a smooth uninterrupted look. Even on a small project like this cushion cover.
*to determine how much more fabric you need, measure the length of the pattern repeat from the start of the pattern to the point where it begins (repeats) again. This is one pattern repeat. Next determine how many repeats you need for one side. For a cushion cover it could be less than one repeat, for a curtain making project you might need two or more repeats per curtain drop. Once you know how many repeats you need then you can calculate the total amount of fabric needed for your project.
Happy sewing!
Friday, September 23, 2016
Gathers
Recently I have been thinking about using gathers to add interest to my work. When fabric is gathered it creates folds on the fabric surface. The folds (or hills and valleys) create light and dark areas on plain fabric which add subtle visual interest. On printed fabric the gathers alter the look by hiding tiny sections of the print.
To gather fabric start with a piece of fabric at least twice the length of your finished project. Gathers reduce the length of fabric.
Basic ways to Gather
By hand- sew a running stitch on the section you wish to gather, pull the thread to create the desired fullness. Tie off thread ends to hold gathers. Hand gathering works best on small projects.
Machine Gathers- use an all purpose presser foot. Set stitch length to longest stitch. Sew a straight row of stitching on the section to be gathered. Leave thread tails long. Do not back stitch. Pull bobbin thread only to create folds.
Alternatively you can use a zigzag stitch and cord. Place the cord along the section to be gathered and centred under the presser foot. Stay stitch the cord at one end then zigzag stitch down the cord length, encasing it in the stitches but not catching the cord. Pull cord to form gathers.
Gathering foot- a small and easy to use foot. The gathering foot automatically gathers the fabric as you sew. Select the longest straight stitch setting, place the fabric under the presser foot and sew. That's it, fabric will be gathered evenly. The gathering foot can also be used to gather fabric and attach it to a second piece of un-gathered fabric. Simply place the fabric you do not wish to gather in the slot between the top and bottom of the foot. The challenge here is making sure both fabrics are kept straight. Also for a tighter gather place a finger behind the presser foot. This slows the fabric movement and creates more gathers. A ruffle foot is another attachment that automatically gathers fabric.
Finally other ways to gather fabric are by using elastic and gathering tape. Gathering tape is used in curtain making.
To gather fabric start with a piece of fabric at least twice the length of your finished project. Gathers reduce the length of fabric.
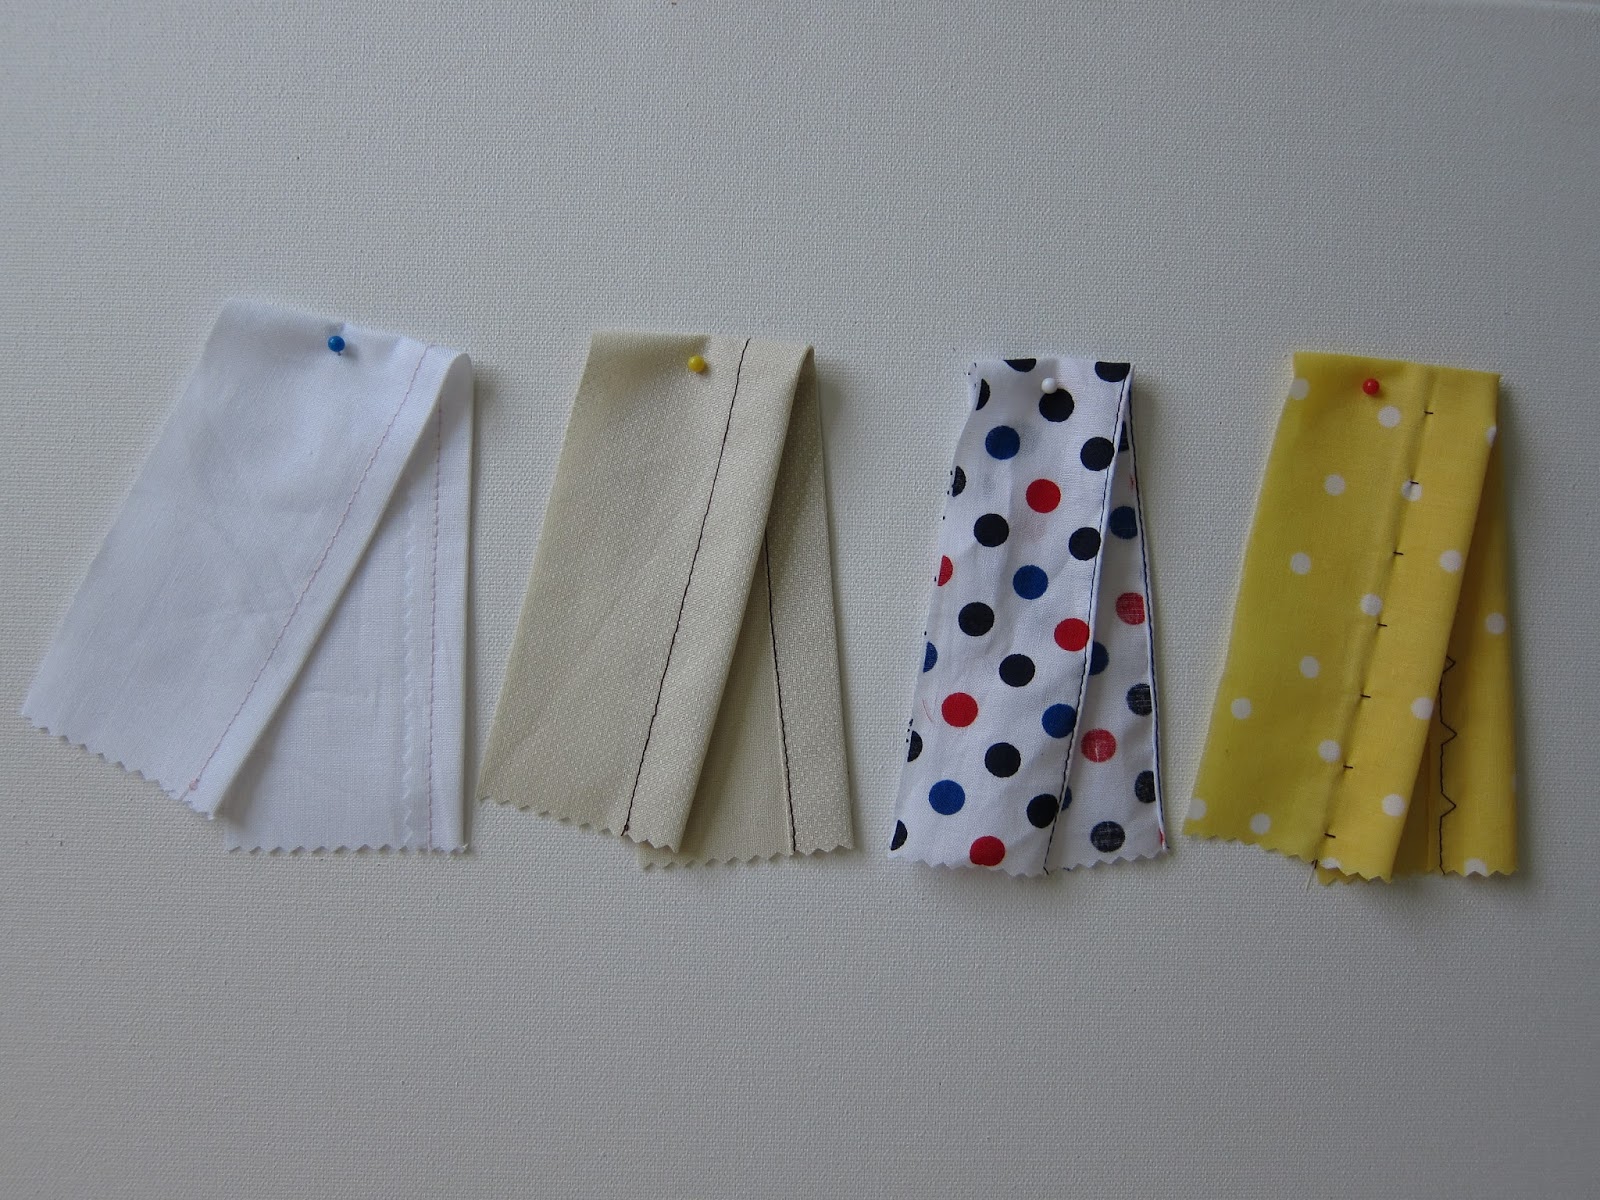
 |
| Results of the different gathering methods. For the first 3 samples I started with a 10 in strip and gathered it up to 5 inches. From the top hand gathers, straight stitch machine gather, zigzag stitch machine gather and gathering foot with un-gathered top piece. |
Basic ways to Gather
By hand- sew a running stitch on the section you wish to gather, pull the thread to create the desired fullness. Tie off thread ends to hold gathers. Hand gathering works best on small projects.
Machine Gathers- use an all purpose presser foot. Set stitch length to longest stitch. Sew a straight row of stitching on the section to be gathered. Leave thread tails long. Do not back stitch. Pull bobbin thread only to create folds.
Alternatively you can use a zigzag stitch and cord. Place the cord along the section to be gathered and centred under the presser foot. Stay stitch the cord at one end then zigzag stitch down the cord length, encasing it in the stitches but not catching the cord. Pull cord to form gathers.
 |
| Gathering foot |
Finally other ways to gather fabric are by using elastic and gathering tape. Gathering tape is used in curtain making.
Wednesday, September 21, 2016
Working with Knit Fabric
 I purchased 2 yards of a gray knit fabric last week($8 a yard). Its a cotton poly blend with gold polka dots. I have not done much sewing with knit fabric so was eager to try something easy. I chose the 'Go-To Dress' from "Sew What You Love" for my first make (pictured above). To stitch the dress I used the straight stitch for stretch fabric for the seams and a narrow zigzag for all the hems. I used a size 90/14 ball point needle.
Next I will try 'The Walkley' pattern from Simply Sewing. I have just enough fabric to make the top.
Happy Sewing.
Friday, September 16, 2016
The hardest thing
 |
| The bag so far. Still needs a zipper closure and lining. |
The hardest thing about creating is getting started. Once I begin there is no stopping me. Take 'The Melbourne Weekender' bag, this project has been sitting around and moved around my work table for probably 9 months, maybe more.
This past week I began it and am happy to say its almost finished, just need to make the zippered closure and lining, but first I have to go buy the right colour zipper.
Happy Sewing!
Saturday, September 10, 2016

Wednesday, August 17, 2016
Sew Illustrated (book review)
 |
| my coasters using Minki's technique |
I first saw Minki Kim's work in Haute Handbags. I thought she had used free motion stitching on her bags and wondered how she had achieved such neat, accurate and controlled lines. Upon reading the article I realized that Minki Kim used a difference method, I was very eager to learn it myself. How happy was I to read she was releasing a book, of course I pre-ordered and it arrive last week. First I read the book cover to cover and then set about trying the technique myself using the coasters project from the book.
Other than the small design placement hiccup, the instructions are well written, easy to understand and follow. The photographic steps provide sufficient detail to demonstrate the technique.
The book contains 16 projects, divided into 5 categories.
1 Projects for the table ( the coaster project plus two more)
2 Projects for the crafter
3 Projects for everyday
4 Bags for every occasion
5 Art for your home
My favourite project (just making it on the cover ) it a precious family portrait. One I would love to make of my own family.
Sew Illustrated by Minki Kim and Kristin Esser, retails for $25.95 ( e-book available) There is a pullout iron-on transfer of all the designs in the back)
My Coasters
I used two different transfer techniques, for the teapot and cup (on the left in the photo)I tried the iron-on transfer method, using the pull out page. For the teapot only, I drew the design freehand using a frixion pen.
Both methods are simple to use. At present I do not have a preference.b
Wednesday, August 3, 2016
Red, White and Black Pincushion
 |
| Red, white and black the perfect colour combination!
This little pincushion is made from two 5'' squares in different prints and the half -square triangle (HST) technique. A basic tutorial on HST's can be found here.
|
Wednesday, July 27, 2016
How to Free Motion Stitch and Applique in 10 easy steps
 |
| Ice Cream Hoop Art |
Ice Cream Hoop Art
What you will need
5 inch embroidery hoop
fabric scraps in red, blue, cream and brown.
back ground fabric measuring 8 x 8 inches
fabric glue
ice cream template
black thread
darning foot
hand needle.
Instructions
1. Using the template cut out the ice cream scoops and cone.(or you could cut out the shapes free hand)
2. Assemble and glue the ice cream shapes in the centre of the background fabric.
3. Place the fabric into the embroidery hoop, (the opposite way to normal, so the inner ring is on the right side of the project)
4. Lower the feed dogs, change to a darning foot, place the hoop under the darning foot.
5. Using black thread begin free motion stitching around the ice cream shapes. For a bolder look stitch over the original stitching again. Don't forget the cherry stem.
6. Remove the hoop from the machine and remove project from hoop.
7. Place project back in the hoop, this time the right way ( as seen in the photo above)
8. Trim excess fabric to 1 inch around hoop
9. Hand baste around fabric edge. Gather the fabric into the back of the hoop. Tie off the thread.
 |
| wrong side of project with fabric gather |
10. Hang up your new art work and enjoy.

Wednesday, July 20, 2016
Founation Paper Piecing

My thoughts on Foundation paper piecing now are:-
1 this is a good project to use up small fabric scraps
2 very time consuming cutting all the tiny squares and rectangles
3 with the paper guide stitching accurate and straight seams is easy
4 NOT difficult or confusing.
My finished pouch measures 3 x 7 in. A perfect size to store my pens.
You will find more information on this technique here.
What new technique have you tried recently?
Sunday, July 17, 2016
Pouches and pouches


My recent makes. The patch pocket was added as an excuse to use some pretty trim. Enjoy!
Friday, June 10, 2016
Wild and Wonderous Butterfly Pouch

I love the colours of the fabric in the left corner. It's a fabric I found in the clearance section at Joann's last summer. I have used it to make PJ shorts, a cushion and now this small pouch (size 4 x 6 inches).
Thursday, May 19, 2016
Machine Stitched -Hems
 |
| left to right Single fold hem-Double Fold hem-Narrow Rolled hem-Blind hem A look at 4 ways to finish a hem using your sewing machine. Single Fold Hem- this is a basic hem. Simply pink or zigzag along the raw edge to stop it from fraying. Next turn the edge over once towards the wrong side, press and stitch into place using a straight stitch or decorative stitch and a all purpose foot. Double Fold Hem- As the name suggest you fold the fabric twice towards the wrong side. The first turn is to hide the raw edge. Press after each turn and stitch in place after the second turn. To achieve a neat finish stitch slowly from the wrong side. Follow the folded edge. Narrow Rolled Hemming Foot- This foot is designed to stitch a neat and narrow double hem. The fabric is folded and stitched as it passes through the coils in the front of the foot. On the underside of the foot is a small channel that allows the rolled hem to pass freely. To use a rolled hemmer foot, attach to machine, place the fabric wrong side up. Pull the hem allowance over the coils and slightly to the left. Stitch slowly, occasionally check that the fabric raw edge is rolling into the hem and is not exposed. Practice on scrap fabric first. The narrow hemmer foot is ideal for lightweight fabric. I have used a quilting cotton in my sample above. Blind Hem Foot- This foot is used with a blind hem stitch to stitch an almost invisible hem. My machine has a stitch setting for firm fabric, the stitch is a row of straight stitches followed with one zigzag stitch, and a stitch setting for stretch fabric, the stitch is a row of short zigzags followed by a wider zig zag. My blind hem foot pictured below is adjustable. This foot has a protruding guide that helps stitch in a straight line. To use the blind hem foot, fold raw edge of hem to the wrong side of fabric and press. Fold hem under garment with only a 1/4'' of hem showing on the right. The garment should be resting on the left. Stitch slowly on the exposed 1/4'', the protruding guide should but up against the top fold, make sure the zig zag stitch catches the top fold. When fished unfold fabric, on the right side there will be a row of evenly spaced stab stitches visible. Press to set the stitching. |
 |
| left to right All purpose foot-Narrow Rolled Hemmer foot-Blind Hem foot |
Monday, May 16, 2016
Exploring Free Hand Machine Embroidery

Mug Rug
I enjoyed my first attempts at free hand machine embroidery so much that last week I purchased Simply Stitched Gifts by Cynthia Shaffer from my local Barnes and Noble. The book retails for $17.95. It contains 21 projects to make and a chapter on free-motion basics that covers needles, presser feet, fabric, stiffeners and adhesives, thread and also provides a practice free motion stitching guide sheet. Also in the basics chapter Cynthia explains the differences of free-motion stitching, embroidery and quilting. Free motion stitching is stitching freely with the feed dogs lowered, free motion machine embroidery means you are creating solid areas of stitching and in free motion quilting there is batting under the top fabric. The main difference between my first attempts at free hand machine embroidery and Cynthia's way of working is that were I used an embroidery hoop to hold the fabric, Cynthia uses quilting gloves to grip the fabric.
From the 21 projects in the book I chose to make the modern mug rug. I followed the 37 steps without a problem and am pleased with my finished rug (pictured above).
If like me you are new to free hand machine embroidery this is a good guide book with many contemporary projects to try.

Monday, May 9, 2016
The Ottoman

The book has about 30 projects, divided into four categories- handmade handbags ( 5 projects), sewing for little ones (this is the largest section in the book, it includes projects for soft toys, skirts and blouses for girls aged 1- 14), home style (6 projects including the ottoman, pincushions, storage boxes and a quilt), and personal style (8 projects for skirts, dresses and a tie). The book has something for everyone. Lovely photos, illustrations to explain each step, spiral binding and full size templates tucked into a back pocket. The projects range from beginner to intermediate level. 'Sew What You Love' retails for $24.99.
Overall I am happy with my purchase and my new ottoman.
Thursday, April 28, 2016
Freehand Machine Embroidery

You need a darning foot, a embroidery hoop, to hold the fabric taut, thread and of course fabric to start.
To lower the feed dogs refer to your machine manual, on some machines you need to cover the feed dogs instead of lowering. I practiced on scrap fabric using a straight and zigzag stitch until I ran out of bobbin thread. I began with a small 5'' hoop but this was not big enough.On the red sample below I used a 12'' hoop this is a good size for my machine.The fabric is mounted on the hoop the opposite way to normal.
The stitch length is determined by how fast you move the hoop. If you move the hoop slowly the stitches are short, quickly and the stitches are very long.
It's fun and easy to freehand machine embroider, try it.

Wednesday, April 20, 2016
Quilted Slippers

happy sewing
Wednesday, April 13, 2016
A Pintucked Cushion

Tucks will reduce the fabric, therefore you should begin with a larger piece of fabric, once tucked the fabric becomes stretchy.
To Pintuck-I began with a 12 x 20 inch piece of fabric. Using tailors chalk, I marked horizontal lines, 1 inch apart, on the right side of the fabric. Next, fold on the marked line, with wrong sides together. Stitch on the right side of the fabric, no more than 1/4 inch from the folded edge. Repeat with the next line. My finished piece measures 12 x 14in.
Experiment using pintucks to add interest to your next project.
Tuesday, April 5, 2016
The Raw Edge
The seam allowance is the excess fabric between the stitched line and the raw edge on the wrong side of a project. Unless finished the raw edge will fray during washing. Two quick and easy ways to finish the raw edge on woven fabrics like quilting cotton are listed below.
 Pinked- Using your pinking shears cut along the raw edge of the seam allowance. The hills and valleys stop the fabric from fraying.
If you don't own a pair of pinking shears another method is to use the zigzag stitch.
Zig-Zag- Set your machine to the following stitch zigzag, length 3 and width 4. Stitch close to the raw edge.
 In my example I used my overcasting foot. I like using this presser foot because I can line up my fabric with the black tab on the right. This allows me to keep my stitching straight. The zigzag stitch falls right on the raw edge picking up the bottom thread to from an overlock stitch, kind of like wrapping the raw edge with thread.

If you don't own a pair of pinking shears another method is to use the zigzag stitch.
Zig-Zag- Set your machine to the following stitch zigzag, length 3 and width 4. Stitch close to the raw edge.

Friday, March 25, 2016
A Soft Toy

Materials needed
Linen 12'' square
fleece fabric scraps for inner ear and tail
embroidery thread for eyes and nose (brown or black)
stuffing
Instructions
1 Using template cut two bunny shapes from the linen fabric, adding seam allowance of 1/4''.
2 Cut two inner ears and one tail from fleece.
3 Using a zig zag or satin stitch sew ears to right side of front bunny. Sew tail to right side of back bunny piece.
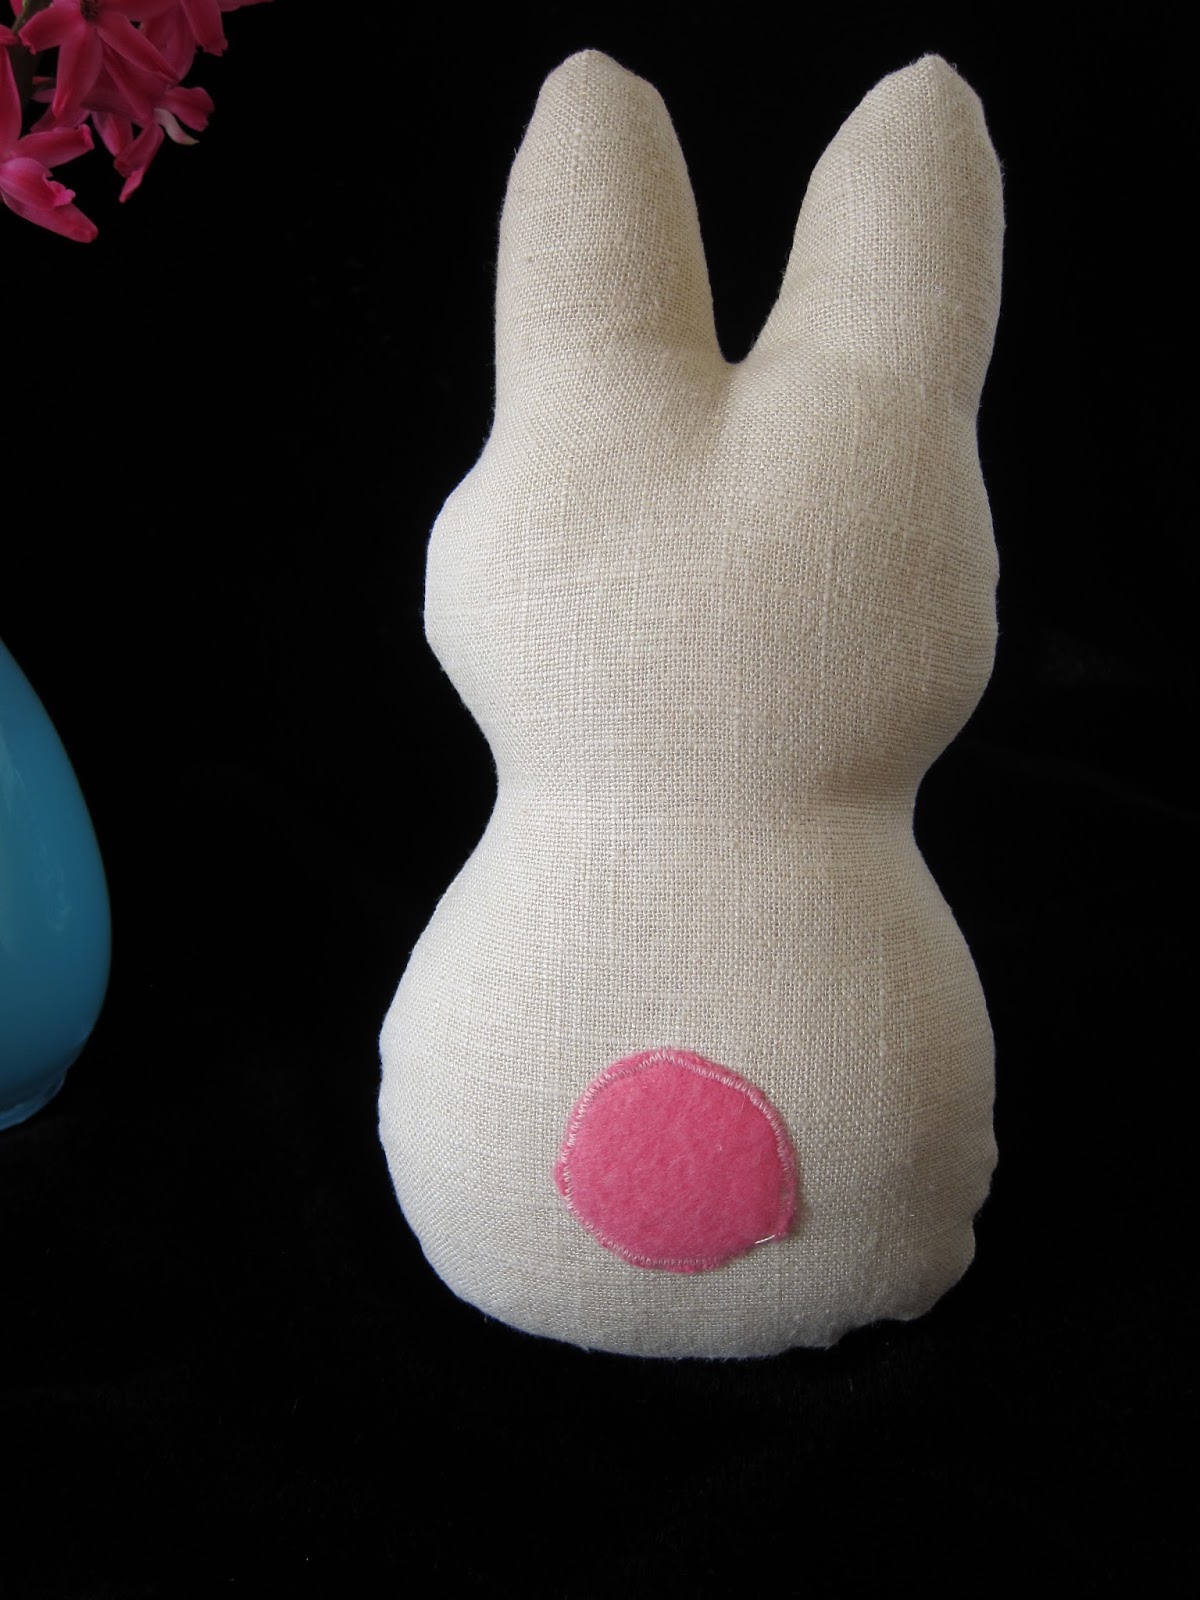
Bunny tail
4 Embroider eyes and nose to right side of front bunny.
5 Place front and back bunny pieces right sides together, sew together start and finish by back stitching. Leave an opening for turning right side out.
6 Clip into seam allowance up to stitch line every 1/4''. Turn right side out.
7 Stuff toy. Ladder stitch opening closed.
Enjoy
 |
| Bunny Template |
Friday, March 11, 2016
Spring Time Cushion

To make the cushion you will need-
One front piece 14 x 14''
Back pieces 11 x 14'' and 5 x 14''
Binding fabric 2 1/4 wide, length of fabric.
Bunny fabric and wonder under 8 1/2 x 11''
Large button
One zipper 18''
Instructions for the front of the cushion
1. Draw bunny shape on paper side of wonder under
2. Fuse wonder under to wrong side of bunny fabric. Cut out bunny shape. Remove paper back, fuse to right side of front piece, centered.
3. Zig zag or satin stitch around bunny shape.
4. Sew button tail on bunny
Instructions for the back
1. Place large back piece (11 x 14) right side up on work surface. Position zipper face down along 14'' edge. pin and sew together using zipper foot.(tip- allow the zipper pull to excess the edge of fabric, this way you do not need to move the zipper pull when stitching)
 |
| small back pieces pressed under 1''. zipper excess fabric edge. |
3. Press one 14'' edge of smaller back piece under 1'' to form a crease.
4. Place this edge along zipper edge,(raw edge aligned with zipper edge) right side of fabric to right side of zipper. Stitch together.
5. Refold at crease (the crease should cover the zipper), topstitch, allow zipper foot to follow zipper teeth.
 |
| Flap covers zipper. Zipper pull with in fabric area. |
6. Back piece should now measure 14 x 14''
7. Trim the zipper , but first make sure the zipper pull is within the fabric area.
8.Stay stitch at each end of zipper
Instruction to finish cushion
1. Place front and back pieces wrong sides together, using a 1/4'' seam allowance stitch all four sides.
2. Bind cushion edges. For instructions on binding follow steps 7 to 12 from my potholder tutorial.

Thursday, March 3, 2016
Sewing with Faux Leather
 |
| the fabric gathered because the faux leather piping was sticking to the presser foot.
Working with faux leather this week I learnt by placing the sticky fabric between paper and sewing slowly I can avoid this problem.

I placed tracing paper between the zipper foot and faux leather piping and used my fingers to guide the fabric, stitching close to the piping.
|
Wednesday, February 24, 2016
Sewing Machine Needle

Further reading allowed me to gather the following advice. Firstly, my sewing machine manual suggests to replace a needle 'regularly, especially if it is showing signs of wear and causing problems'. Problems are skipped stitches , upper thread breaks, noisy machine or the needle breaks.
Shea Henderson in School of Sewing gives the following advice, replace needle each time you clean your machine, after every large project or after eight hours of sewing.
Good advice but I was thinking it would be lovely if my machine had a warning light that just lit up when I needed to replace the needle , like my car does when something is not working right.
A sharp needle gives the best sewing results. so if you are experiencing stitch problems or cannot remember the last time you replaced the needle do it today.
If this is the first time you will be changing a needle please refer to your sewing machine manual for instructions.
Happy Sewing
Monday, February 22, 2016
A Kitchen Project
Turn a pile of fabric scraps into a pot holder in under 1
hour. I used the leftover binding pieces
from my last two projects. This project is perfect if you have lots of fabric
scraps and only a little time to indulge in some sewing. Also it’s a good
project for the new quilter because it allows you to practice sewing a ¼ in
seam allowance, make a quilt sandwich and finish with binding your piece.

Finished Potholder
Pot hold size 8 x 8 inch (20 X20 cm)
Materials
Fabric scraps in 3 different fabrics
Backing fabric 8 ½ x 8 ½ inches
Binding fabric 2 1/4 inches x fabric width
Batting (Insul – bright) 8 ½ x 8 ½ inches
Matching thread
Walking foot (optional)
Seam allowance ¼’’
1 Cut fabric as follows
One 1 ½ x 4 ½ ‘’strip for hanging loop
The following strips are 2 ¼’’ wide
Fabric A one 2 ¼’’’square
Fabric B one 2 ¼’’ square, one 4’’ strip, one 6 ¼’’ strip
and one 8’’ strip
Fabric C one 4 ¼’’ strip and one 6’’ strip
 |
| number sequence |
2 To make the pot holder top. Pin and stitch the two squares
right sides together on one side. Open seam and press. Next sew the 4’’ strip
to the left side of the two squares. Follow this by pinning and sewing the 4 ¼’’
strip to the top of your sewn piece. Continue stitching the fabric strips using
the number sequence as shown in the photograph. Each new strip sewn will be
longer than the last piece.
3 Make a quilt sandwich as follows – backing square right
side down on work surface, insul-bright batting in the middle and patchwork
square right side up. Pin to hold the layers together.
 |
| Quilt sandwich |
4 Quilt the sandwich. I chose to quilt on the diagonal
beginning in the centre of my pot holder. First I used a fabric marker to draw
diagonal lines 1’’ apart on my potholder top. Using my walking foot I stitched
on the drawn lines. (A walking foot will minimize slipping of fabric and
wrinkles. A regular presser foot can be used if you don’t have a walking foot)
5 Trim the quilted potholder to 8 x 8 inches
6 To make the hanging loop. Fold the 1 ½ x 4 ½’’ strip
lengthways wrong sides together and press. Open and press the raw edges so they
meet in the centre. Fold the strip in half lengthways again, topstitch down
both sides. Fold the strip in half so the raw ends meet. Pin the loop to the
back of the potholder on one edge 1’’ in from the corner, align raw edges.
Baste into place.
7 Press binding strip in half lengthwise wrong sides
together. Open binding fold one short edge ½’’ towards the wrong side. Press.
This is the start of your binding.
8 Place binding with folded short edge along one raw edge of
the pot holder front (somewhere in the middle of the edge). Align raw edges,
for the first 2 inches only stitch through one layer of binding. Sew using a ¼
inch seam allowance.
9 At each corner stop sewing ¼’’ before the edge sew off the
corner of the project at a 45 degree angle. Remove potholder from sewing
machine.

10 Fold binding upward at a 45 degree angle. Hold the fold
with your finger and fold binding back down along next edge. Continue sewing.
Repeat at each corner.

11 When you reach the start trim binding 2’’ longer than you
need. Tuck the excess between the start binding and stitch through all layers.

12 Press binding away from potholder front. Fold binding
around to the back side of the potholder. Stitch binding to the back. I used a ladder
stitch.
Tuesday, February 16, 2016
The Placemats

I also made placemats that coordinate with my double oven glove project. Project 11 from this book will show you how to make similar placemats.
Subscribe to:
Posts (Atom)
Breaking the Pattern- Review
I was excited to see a new sewing book at my local library last week. Without much thought I checked it out. The book is 'Breaking ...

-
I set myself the goal of learning to sew my own clothes in 2017. There are 4 me made dresses and skirts hanging in my closet. Yes, if you lo...
-
 I was excited to see a new sewing book at my local library last week. Without much thought I checked it out. The book is 'Breaking ...
 -
 I love this fabric is it 100% cotton chambray. I original made it into a gathered skirt for my daughter but after a year of it sitting at...